Wednesday, November 30, 2011

Making some good quiche

Well, its been a while since I have posted anything. I have been rather busy with my Winter Symposium (a training event that we have at my work).

This recipe was something I came across on a recipe book I bought when I used to be a teacher. For this time, I made quiche with some leftovers that I had when I went to visit my family down in Lower South Texas. Needless to say, they really did love this. It was the first time that my mom had quiche. I had also made potato croquettes (recipe for another time). I doubled this recipe in order to have two different types of quiche.

Ingredients:

1 cup flour
1/2 cup unsalted butter, softened
1 egg
2 to 3 oz water
Dash Salt
butter
1 oz diced ham
3 eggs
2 cups half & half
1 oz Swiss
1 oz White Cheddar
1 pkg mushroom
2 tbsp butter

Combine the flour and salt. Add the butter and work it into the flour until the consistency is coarse.


Stir and work in the egg and water until dough becomes a ball. Coat the work surface with a little flour and let the dough rest for a couple of minutes.


Now keep in mind, I had leftover large eggs. I used them and had a dough that was a little sticky. I had to add flour until it was able to work.


Preheat the oven to 350 F. Butter a pie dish. What I ended up using was 2 cake pans.


Spread the pastry out to cover the bottom and sides with fingers. Use flour to help, push dough from middle to sides of dish. Let pastry stand a bit higher than the dish edge. Bake the pastry for 5 to 10 minutes. Remove from the oven before the pastry shrinks, adjust the sides if you need to.


Place ham and cheese in the pan. In meantime, beat the eggs and half & half. Add pepper and salt.


Work with all the ingredients. I have different fillings for the quiche. I am using leftover green onions, ham and mushrooms that I used for Thanksgiving. I have shredded cheese, diced the green onions, diced and reheated the ham and sauteed mushrooms.


Add the ingredients that you have sauteed or diced. Add the cheese on top of the ingredients. Pour the egg mixture into the pan and bake for 30 minutes until center is firm.


As you know, I have made two different types. One was mushroom with a small amount of ham and green onions. The other was ham and green onion.

Monday, November 21, 2011

Devil Eggs (with Smoked Salmon)

So here's another recipe that I have done for a couple of events that I had here at home. I really do like this recipe as it incorporates less mayonnaise than I like in devil eggs. Personally, I don't care for devil eggs, but when I came across this I decided to try it and it was rather good.

Ingredients:

8 large eggs
6 oz cream cheese
1/2 cup sour cream
2 tbsp mayonnaise
4 oz smoked salmon
1 tsp paprika
1/2 cup chives
Additional paprika and chives for garnish
Salt and pepper to taste

First, start by boiling the eggs. Ina Garten came with a great tip. Bring the water and eggs to a boil. After it starts to boil, turn the heat off and let set in the hot water for about 15 minutes.


Once you have this cooled, peel the eggs and clean them from any skin or egg shell that may be left behind. Cut the eggs lengthwise. In a separate bowl, add the egg yolks.


In the same bowl,  add the rest of the ingredients to the yolks. With an electric mixer, mix on medium speed the yolks and all other ingredients (with the exception of the chives) until smooth.


Finally, incorporate the chives to the mix. If you like, drizzle paprika onto to the eggs. A great appetizer to have year round!


Sunday, November 20, 2011

Stuffed Baby Bellas with Italian Stuffing

So its the holidays and it seems we will all be busy making plenty of food for all the planned festivities this week. Personally, I had cooked some this weekend, but I think I will be equally busy back home with my family for the Thanksgiving week.

This past weekend, we ended up going out to the pond and enjoyed some great company out there. We all decided to have our own family Thanksgiving as I won't get to see "my adopted family" this coming week. Luckily, we had a great time and I have to say that the chicken fried venison was wonderful (recipe coming sometime in the future).

This recipe is something that I have changed up from another recipe that I had come across on the Food Network. I just substituted using a dressing mix. Sometimes, (and I have said this in the past) cutting corners is OK.

Ingredients:

1 pkg Italian sausage (12 oz)
2 tsbp butter
4 celery stalks, chopped
1 large onion, chopped
1 bell pepper, chopped
1 tbsp minced garlic
1 pkg cornbread dressing mix
2 tbsp butter (per the dressing instructions)
1 tsp thyme
1 tsp rosemary
1 tsp fresh ground course pepper
2 packages 
Olive oil
Salt to taste

Well, first start with cooking the Italian sausage. When cooked, place the sausage onto a plate in order to allow the oil to drain from the meat. Notice that this is already pre-seasoned. If you can't find it already seasoned, then add a little spice to your meat (this would be thyme, rosemary, red pepper flakes, oregano).

Drain some of the fat. Add the 2 tbsp of butter to the pan. Add the chopped celery, onion, bell pepper and garlic. Once they are translucent and tender, then take off the heat.


While that is cooking away, start to prepare the cornbread dressing mix. Follow the directions as stated in the box. Have the water and butter come to a boil. Add the spices to the water. Allow to set on the side and mix in the breadcrumbs from the package. You can now add the meat and veggies to your cornbread mixture.

Get your packages of mushrooms. Take the stems off and start to clean them. I was told that it was best to clean them with a damp cloth. In a separate baking dish, place the mushroom caps stem side up.

Once they are in the dish, drizzle all of the caps with some olive oil. If you want to add a little of salt and pepper, then do so now. After you have done this, then you can start assembling the caps by filling them with the dressing mixture.

Allow to cook for 30 minutes on 350 or when the mushroom caps are tender. You can drizzle it with some cheese, but I prefer just the way they are. Great as an appetizer or just as a "side dish" for Thanksgiving!

Thursday, November 17, 2011

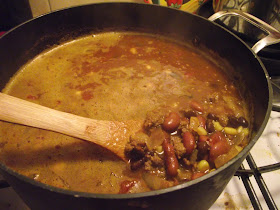
Having a great bowl of chili

Last time, I had a post of white bean chili. It was a great recipe because it incorporated plenty of white beans and chicken. Any type of chile can take alot of time to cook especially when you have to work with dry beans.

Well, the following recipe is rather easy as cook time is not as long as you would think. Including prep time, it would be about 45 to an hour. Like most of my posts, I cooked this on Sunday and allowed the chili to cool before I place in the refrigerator. It does keep well and you would be amazed when you do finally eat it that it does taste so much better than eating it the day of.


Ingredients:

1 lb lean bison meat                           1 large onion
1 can black beans                               1 can light red kidney beans
1 can Ranch style beans                     1 can chili ready tomatoes
2 cups Beef stock                               1 can whole kernel corn
1 tsp paprika                                       1 tbsp worcheshire
2 tbsp chili powder                             1 tbsp minced garlic
1 tbsp cumin                                       1 tbsp ground pepper
1 tsp salt

Get the meat that you have and start to cook it. Notice that the pound of meat that I have was actually frozen. I completely forget to thaw it out, so I had to slowly cook it out.


Dice the onion. Once it's all done, add the onion to the cooking meat. Allow it to continue to cook until the onion starts to get somewhat translucent.


So with this recipe, I have added 3 different beans. You can add whatever type of beans to the chili you are making. When dealing with the beans, its always better to clean out the preservatives within the can of beans. I tend to rinse them out a couple of times. Once you are done rinsing, add them to the meat.


Allow the beans to cook, in the mean time you can add one can of tomatoes. I normally don't like to make it too much with tomato so I have found one can is enough. Hunts has a great type of canned tomato that is well seasoned and great for chili.

 Once you have added that, then add 2 cups of the broth or stock. Either way its better than just using water. Allow it to cook for about 30 minutes.


 Now add the spices to the beans. Notice that I do not add too much salt to this recipe. I am trying to be good by not having too much. If you feel that you need to add more, be my guest. This also goes for the spices. The recipe should be enough, but even I added a couple of dashes of cumin and chili powder to add more flavor.


After you have added the spices, continue to bring this to a boil, stirring on occasion. While that is continuing to cook, open a can of whole kernel corn. Like the beans, make sure you wash the preservatives as we did with the beans.


Allow it to continue to cook. Give it a taste and take off the heat when you see the broth has reduced. The starch within the corn will act as a thickener. 


Remember, this was cooked a couple of days ago and the spices have settle within the mixture. Well, I added some sharp cheddar/colby jack cheese and some sour cream. Such a nice bowl of goodness!