About Me

My photo
Houston, TX
Just your atypical hispanic male living in the big city

Sunday, July 29, 2012

Chocolate Cupcakes with Chocolate Buttercream Icing

I love sweets. Who doesn't, but I have to say that it has to be in moderation. I used to be a rather large kid and young adult, so I find that I can only have really great sweet stuff every now and again....but when I do...I do love having a nice piece of cake. Cupcakes are just as good especially when you can all that goodness in a couple bites.


This recipe is actually from Ina Garten. I really did appreciate all the work that it took to make this as a cake, but of course, I have to change it some to make it more bite size for the  two gatherings I had planned to attend with MC. Along with these cupcakes, I made the Italian Cream Cupcakes. WARNING: This is a rather rich recipe, so if you want something light, don't use this recipe. Otherwise, enjoy this decadent and highly enjoyable dessert!

Ingredients for Cupcakes:

1 3/4 cup all purpose flour
2 cups sugar
3/4 cups cocoa powder
2 teaspoons baking soda
1 teaspoon baking powder
1 teaspoon kosher salt
1 cup buttermilk, shaken
1/2 cup vegetable oil
2 extra-large eggs, at room temperature
1 teaspoon pure vanilla extract
1 cup freshly brewed hot coffee

Preheat the oven to 350 degrees. I am making cupcakes, so I need to make sure that I have enough cupcake cups for the amount of cake dough I made.

Start by sifting all of the dry ingredients into the bowl until combined. Notice I am using a spatula to mix the dry ingredients together. You are more than welcome to use an electric mixer, but its all based on personal preference.


In another bowl, combine the wet ingredients. Notice that I lightly mix the wet ingredients with a fork.


Once you have mixed the wet ingredients, you can slowly add the mixture to the dry ingredients a little at a time.

With mixer still on low to medium, add the coffee and stir just to combine, scraping the bottom of the bowl with a rubber spatula.

Pour the batter into the prepared cupcake pans. Some people like to use foil and bake for 35 minutes. I use a toothpick to check if the cupcakes are done. Cool in the cupcake pan for a couple of minutes and then take out of the pan (probably need to use a knife), then place in a pan to allow to cool completely.


Ingredient for Buttercream:

12 oz semisweet chocolate, chopped
3 sticks unsalted butter, room temperature
1 tbsp pure vanilla extract
2 extra-large egg yolk, room temperature
1 1/2 cup confectioner's sugar, sifted

IF you haven't done so, chop the chocolate. I am using Ghirardelli chocolate. Any type of higher end chocolate is great for this recipe.


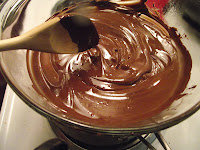
Prepare the double boiler. I am using a glass bowl over a pot full of boiling water. Stir in the chocolate until it has melted. Make sure you take off the heat and set off to the side assuring that is is at cool to room temperature.
 

I am using an electric mixer. Beat the butter on medium until light and fluffy (at about 3 to 4 minutes).


Sift the confectioners sugar into a bowl. Lower the electric mixer and start to add the sugar a little at a time. Make sure that the mixer is combining well until rather smooth. You might notice that there is some sugar on the side. You are going to need to scrape the sides and continue to stir blending well.


 Add the melted chocolate to the butter/sugar mixture. Mix well until blended. Place off to the side.

Now you are ready to spread the chocolate icing on each of the cupcakes.


After I have made this and the Italian Cream Cupcakes, I iced both of them. Some of the cupcakes went to a family gathering we had one night. I opted to make (or at least try to) bear cupcakes for a pool party the following afternoon. Here's the thing. For the following day, I had the icing in the refrigerator. I brought the icing back to room temperature in order to be able to work with icing the cupcakes. I used chocolate for ears. Needless to say, this was a great idea since many who had them loved it. 
 

Thursday, July 26, 2012

Making your own Special Chex Mix

Well we all entertain. Its hard to decide on what you want to offer as "appetizers". You can really go over the top by providing elaborate appetizers that are time consuming. Sometimes, though, it's nice to just create something that is simple, but doesn't take a lot of prep time. This is one of those recipes that really doesn't take much of your time to make. Basically, you are just placing all the items in a container and mix. Keep in mind that I normally make this always in larger batches (so the pictures reflect making a large batch).


We had about 3 different gatherings we were preparing for. My in laws also like this mix when I make it. So I am actually making a large batch. If you are brave enough to do what I am doing, you first need a large enough container that allows you to mix all of the ingredients (I have 2 large bowls that I use when I make tamales, etc). You also need to have a large enough container to bake the mix in the oven. Either way, it is something that you can bring to a gathering/party and everyone will truly enjoy!

Ingredients:

2 cup Rice Chex
2 cup Corn Chex
2 cup Wheat Chex
2 cup Pretzel sticks
2 cup Melba Toast (Gardhetto's brand)
1 cup Mixed nuts (or one type of nut, your choice)
1/2 cup butter, softened
2 tbsp Worcestershire
1 tbsp cajun spice (like Tony Chachere's)
1 tbsp garlic powder

Preheat the oven at 350 degrees. This will be a little high, but you are baking a nice amount of mix. I need it this high since I am making large batch.


Mix the 3 different types of Chex cereal that you are planning to use. I like to use the different cereals as its a great flavor coming from the mixed cereal.


Once you have mixed the cereal, you may start to add the various pretzel bags that you have purchased. Remember to use a flat spoon to mix well. When it comes to pretzel I tend to limit to different kinds. Sometimes, I use the twists, but I also like a variety like Nibblers, Garlic Bagel pretzels or those really thin pretzel chips.


Add the Rye Chips and mixed nuts. Originally, I don't normally add nuts to the chex mix since sometimes I make this with kids in mind. Since this will be more for adults, I made this with almond, macadamia and cashew nuts. Again, make sure you mix well in order to have enough nuts.


Add the butter to a bowl. Place into a microwave and allow to melt through. Normally this would melt in about 30 to 40 seconds. After you have melted the butter, add the Worcestershire and mix well. Notice that I have two containers since I am making two large batches.


Add the butter mixture to the Chex Mix. Make sure you drizzle a little at a time and then mix after you have drizzled the butter. If you have to, add a little more Worcestershire (I like to do that on occassion).
 

Since the Chex mix has taken on some of that butter and Worcestershire, you are ready to add the spices. I like to have a little bit of a kick. A very good and close friend of mine gave me some cajun spice that a local mom & pop business sells (her family friend). You may add your own spices, but if you use something similar that would be best since you don't want to add to much cayenne or salt. This spice that I am using has an even balance. Also add the garlic. Do this a little at a time just as you did with the butter. Lightly sprinkle a little at a time and then mix.


Now that the Chex Mix is ready, you can place into the oven. I don't cover the Mix as I want it to get well heated with the oven. Most people would just use a baking sheet and spread across. Here's the thing, I am making a LARGE BATCH. You would be doing this all day if you were going that route. I allow it to get well heated for about 15 minutes. Take out of the oven and then mix. I then place it back into the oven. I do this 3 times total.


Once you have done this 3 times, take out of the oven. Allow it to cool completely. You can finally place into bags when the mix is fully cooled. Keep in mind that this is great for a large gathering. You are also able to freeze some of it in a freezer. It does keep well, but I would want to use it before 2 months time and if you are like me, with all the gatherings, these will be gone in no time!!